Interactive TUI
⚠ Known stale (2026-08-20). The TUI predates the CLI rework and is not kept current with newer commands (e.g.
cook-volatile,health,checksum,scan-vins, the schema-4.5 recipe format). It still works for the basics. The CLI is the current focus; the TUI will be reworked later. This page may be out of date.
OpenRemap ships with a full interactive Terminal User Interface built with Textual. It exposes every core feature — identify, scan, cook, tune, validate — without touching the command line.
Launch it:
openremap          # no arguments → opens the TUI
openremap-tui      # dedicated entry point (identical)
No server, no database, no internet connection required.
Layout
The screen is split into two regions:
| Region | Description |
|---|---|
| Sidebar (left) | Navigation buttons for the seven panels, branding, and version number. |
| Content area (right) | A ContentSwitcher that displays whichever panel is active. |
Click a sidebar button or press 1–7 on your keyboard to switch panels.
Panels
⚡ Identify — 1
Single-file ECU binary identification.
Browse for a binary or type its path, then press IDENTIFY. The panel displays a result table with the following fields:
| Field | Example |
|---|---|
| Manufacturer | Bosch |
| ECU Family | EDC17 |
| ECU Variant | EDC17C46 |
| Software Version | 03L906012A 9977 |
| Hardware Number | 0281017696 |
| Calibration ID | — |
| Match Key | — |
| File Size | 2,097,152 bytes |
| SHA-256 | a1b2c3… |
Below the identification fields the panel shows a confidence assessment:
- Tier badge — a four-dot indicator:
●●●●High,●●●○Medium,●●○○Low,●○○○Suspicious,○○○○Unknown - Numeric score — the raw point total from signal analysis.
- Signal breakdown — each signal that contributed to the score, shown with
a green
▲(positive) or red▼(negative) marker and its point delta. - Warnings — any
⚠notes emitted by the confidence engine.
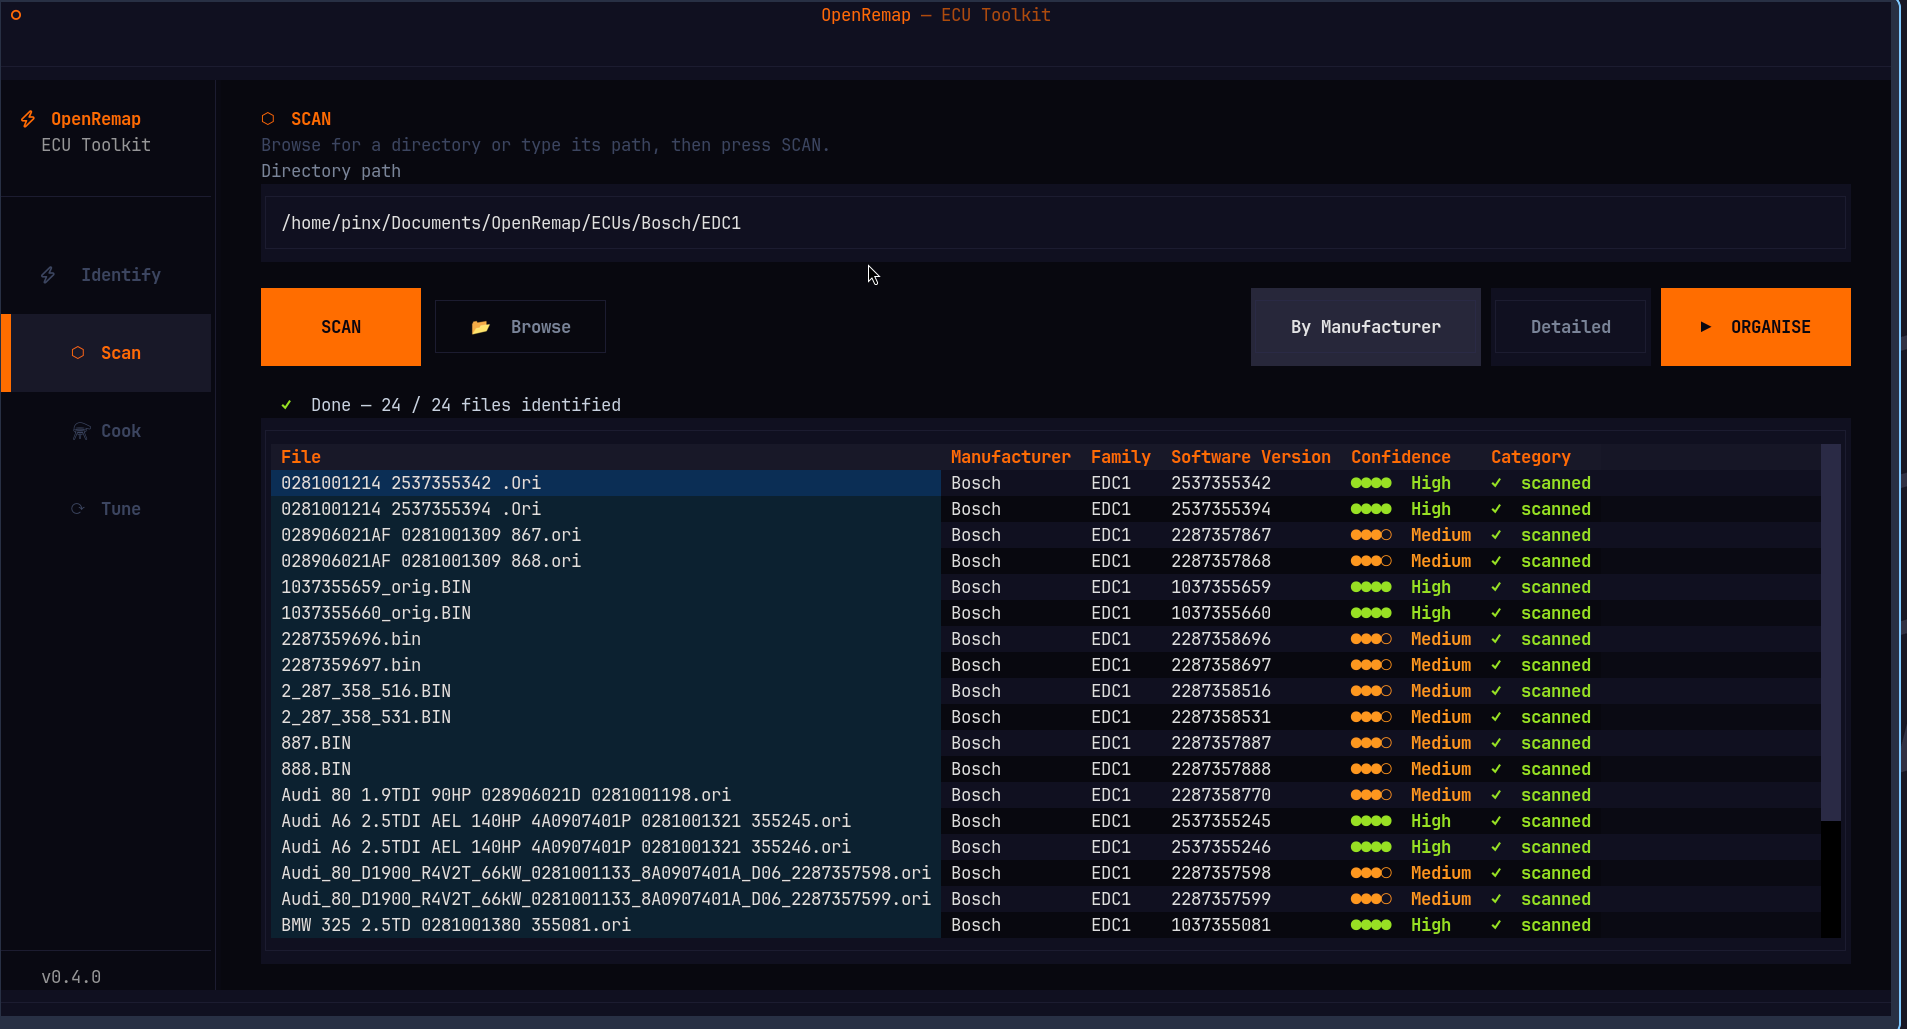
⬡ Scan — 2
Batch-scan an entire directory of ECU binaries.
Browse for a directory (or type its path), then press SCAN. Every file is
identified and classified. Results appear in a DataTable with these columns:
| Column | Description |
|---|---|
| File | Relative path inside the scanned directory |
| Manufacturer | Detected manufacturer name |
| Family | ECU family (e.g. EDC17, MED17) |
| Software Version | Extracted software version string |
| Confidence | Tier badge and tier label |
| Category | Classification result (see below) |
Category colour coding:
| Category | Colour | Meaning |
|---|---|---|
| ✓ scanned | Green | Successfully identified |
| ⚠ unmatched | Yellow | Extractor matched but software version is missing or unknown |
| ✗ contested | Red | Multiple extractors claim the file — ambiguous |
| ? unknown | Dim | No extractor matched |
| ⌫ unsupported | Dim | File extension is not a recognised ECU binary type |
Toggle buttons:
- By Manufacturer — groups organised output by manufacturer only (default).
- Detailed — groups by manufacturer and family, creating deeper subfolders.
ORGANISE button — enabled after a scan completes. Pressing it moves every
scanned file into manufacturer/family subfolders under the ECUs/ working
directory. Unmatched files go to <Manufacturer>/Unmatched, contested files
to Contested/, unknowns to Unknown/, and unsupported files to
Unsupported/.
⚗ Cook — 3
Diff two binaries to produce a .remap recipe file.
Three file inputs are arranged in columns:
| Input | Description |
|---|---|
| Original binary | The unmodified (stock) ECU file |
| Modified binary | The tuned ECU file |
| Output recipe | Where to save the resulting .remap recipe |
Each input has a Browse button (or Save as… for the output). Press COOK to diff the two binaries. The result panel shows the generated recipe summary — number of instructions, byte ranges, and metadata.
⟳ Tune — 4
One-shot workflow: validate → apply → verify.
Three file inputs:
| Input | Description |
|---|---|
| Target binary | The ECU binary to patch |
| Recipe file | A .remap recipe produced by Cook |
| Output binary | Where to save the tuned result |
Press TUNE to run the full three-phase process:
- Phase 1 — Pre-flight check (
validate before): confirms that original bytes exist at the recorded offsets. - Phase 2 — Apply recipe: writes modified bytes into a copy of the target.
- Phase 3 — Post-tune verification (
validate after): confirms that modified bytes are now present at the expected offsets.
The result panel shows a phase checklist (✅ / ❌ / ○) at the top,
followed by a status summary. On success the output path is displayed along
with a prominent checksum warning — OpenRemap does not correct checksums,
so the output must be processed by a dedicated tool (ECM Titanium, WinOLS,
MPPS, Flex, etc.) before flashing.
If any phase fails, a diagnostic message explains the failure and suggests the appropriate Validate mode to investigate further.
✔ Validate — 5
Run individual validation steps against a binary and recipe pair.
Two file inputs:
| Input | Description |
|---|---|
| Binary file | The ECU binary to validate (stock or tuned, depending on mode) |
| Recipe file | The .remap recipe to validate against |
Three mode buttons select the validation type:
| Mode | Description |
|---|---|
| Before | Pre-flight check — verifies original bytes exist at the recorded offsets. Run this before tuning. |
| Check | Diagnostic search — scans the entire binary for original bytes regardless of offset. Use this to diagnose failures when Before reports mismatches. |
| After | Post-patch confirmation — verifies modified bytes were written correctly. Run this after tuning. |
The result panel shows per-instruction pass/fail status with offset, expected bytes, and actual bytes for any failures.
≡ Families — 6
Read-only reference panel listing every ECU family registered in the current
installation. Displays a DataTable with columns:
| Column | Description |
|---|---|
| Manufacturer | The manufacturer that owns this family |
| Family | Family name (e.g. EDC17, MED17, Simtec 56) |
| # Sub-variants | Number of sub-variants registered for this family |
The table is sorted by manufacturer and family. It comes from the extractor
registry — every supported_families key each extractor declares — so it is
considerably longer than the openremap families CLI output, which only covers
the 15-row built-in catalogue (Bosch). The # Sub-variants column is the number
of family keys that row's extractor declares, so it repeats for every row of
that extractor.
ℹ About — 7
Project information panel showing:
- Version number
- Project description
- Registered extractor and family counts
- Links to GitHub and PyPI
- CLI quick-reference (every command with an example invocation)
- Checksum warning reminder
Keyboard shortcuts
| Key | Action |
|---|---|
q |
Quit the TUI |
1 |
Switch to Identify |
2 |
Switch to Scan |
3 |
Switch to Cook |
4 |
Switch to Tune |
5 |
Switch to Validate |
6 |
Switch to Families |
7 |
Switch to About |
Tab |
Move focus to the next widget |
Shift+Tab |
Move focus to the previous widget |
Enter |
Activate the focused button |
Ctrl+C |
Quit (alternative) |
These are standard Textual key bindings.
File dialogs
Browse buttons open a native file dialog appropriate for your platform:
| Platform | File picker | Folder picker |
|---|---|---|
| Linux (GNOME) | zenity --file-selection |
zenity --file-selection --directory |
| Linux (KDE) | kdialog --getopenfilename |
kdialog --getexistingdirectory |
| macOS | osascript (choose file / choose folder) |
osascript (choose folder) |
| Windows | tkinter.filedialog |
tkinter.filedialog.askdirectory |
The TUI tries zenity first, then falls back to kdialog. If neither is
installed (and you are not on macOS or Windows), the dialog silently returns
nothing and the panel displays a notice:
No file dialog available. Install zenity (Linux) or kdialog (KDE) and retry.
You can always type or paste a path directly into the text input and press Enter — the file dialog is a convenience, not a requirement.
File type filters are applied automatically:
- Binary inputs filter for
*.bin,*.ori,*.hex(with an "All files" fallback). - Recipe inputs filter for
*.remap,*.json(with an "All files" fallback). - Save-as dialogs use the same filters as their corresponding input type.
Working directories
On first launch the TUI creates a working directory tree for default file dialog locations:
| Platform | Base path |
|---|---|
| Windows | C:\Users\<name>\Documents\OpenRemap\ |
| macOS | /Users/<name>/Documents/OpenRemap/ |
| Linux | ~/Documents/OpenRemap/ (falls back to ~/OpenRemap/ if ~/Documents does not exist) |
Inside the base directory three subdirectories are created:
| Directory | Purpose |
|---|---|
recipes/ |
Default location for saved .remap recipe files |
tunes/ |
Default location for tuned output binaries |
ECUs/ |
Root for organised ECU binaries (populated by the Scan → Organise feature) |
These directories are only used as starting points for file dialogs — you are free to browse anywhere on your filesystem.